All you need to know about your products!

| 3DNews Vendor Reference English Resource - All you need to know about your products! |
||||||
 |
||||||
|
|
||||||
ASUS Striker II NSE (NVIDIA nForce 790i SLI)Author:Date: 13/06/2008
NVIDIA nForce 790i SLI was announced quite a long time ago, but first products on its base are appearing only just now. However, we won't be sad about that - one of the key traits of this product is support for the DDR3 memory, which became relatively affordable merely a few weeks ago. By the way, NVIDIA has released one more version of the chip, named nForce 790i Ultra SLI. Its only difference from the "non Ultra" is in support for the much faster DDR3 memory modules and the EPP 2.0 technology. All the other specifications of the chipset are absolutely the same. The second important feature of these chipsets is the native support for the PCI Express v2.0. While the nForce 780i SLI was the renamed nForce 680i SLI in which support for the PCI-E v2.0 was implemented with the additional nForce 200 bridge, the north bridge nForce 790i supports the same number of lanes, without additional chips. This chipset supports 62 (!) PCI Express bus lanes altogether, 32 of which meet the v2.0 specifications. Such number allows the motherboard developers install three PCI Express x16 slots on their products and provide support for the 3-way SLI (i.e., consolidation of the computational resources of three NVIDIA video cards).  As regards the south bridge, it has not undergone any changes. That is the nForce 570i MCP chip whose expansion options fully meet modern requirements. The subject of today's tests will be the motherboard ASUS Striker II NSE (nForce 790i SLI). This product belongs to the quite expensive and exclusive "Republic of Gamers" series and is aimed at overclockers and PC enthusiasts. That the motherboard is aimed at this group of users can be seen from the water-block installed on the north bridge of the chipset, as well as the rich package bundle, and powerful overclocking tools (which, as these tests have shown, do work, unlike the Striker II Formula (nForce 780i SLI)). ASUS Striker II NSE Specifications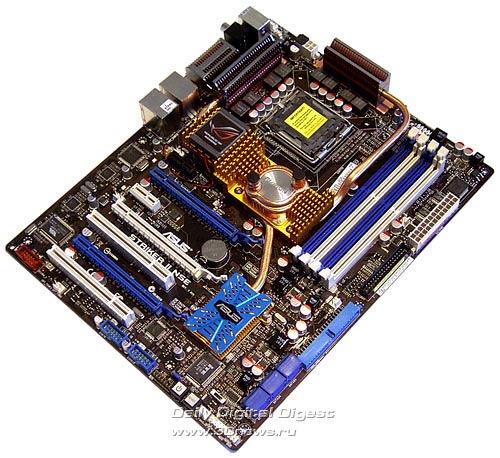
PackageThe board is packaged in a rather impressive box of stylish design:  There is a handle to carry it around, and one page of the cover opens up like that of a book:  Inside the box, the user finds the motherboard in a plastic transparent box, as well as another box with accessories:   Package bundle
The package bundle of Striker II NSE fully meets the level of a high-end product. In particular, the user will not have to look for external thermal sensors or a kit for plugging in a water-powered cooling system in the retail: all these are in the package bundle. The only what has to be bought is the power supply adapters for SerialATA devices (if the user has an "old" PSU) and/or a plate for a couple of USB 2.0 ports (if the "old" housing is used). Let's start with the documentation. The manual is written in a superb way; it covers all the aspects of system assembly and setup (including an illustrated manual for plugging in a water-powered cooling system).  Besides that, the board is bundled with two DVD disks. The first one contains a pack of ASUS proprietary utilities (PC Probe 2, AIBooster, Update, MyLogo 3 + a pack of boot-up images), as well as all the required drivers for Windows and Linux. Besides, there is also Norton Internet Security 2007, and Kaspersky Anti-Virus. Moreover, the disk contains the licensed version of 3DMark 06 Advanced Edition (however, we were unable to find the serial key for this benchmark). The second disk contains the super-popular strategy game "Company of Heroes: Opposing Fronts. Then, the board comes bundled with six SerialATA cables, a power supply adapter with two connectors, PATA- and FDD- cables, a cap to the rear panel (which is capable of protecting the system against the static discharge), as well as a kit of Q-Connectors.  The next items are the additional fan and a plate for two USB 2.0 ports and a Firewire port. 
There are two connectors to set up an SLI array: one flexible to connect two video cards, the other one rigid - for three video cards, respectively.  Besides, there is a kit of clamps, three external thermal sensors, and an LCD-Poster. The latter appears to be a small screen meant to input diagnostic messages. Precisely the same screen was there in the first Striker. It was rigidly fixed on the rear panel, and the LCD Poster can be brought over to any convenient place (as long as the cable length allows that).   If the system is assembled in a "homebrew" way, the PC enthusiast will need rubber supports for the board (9 pcs). Finally, the board has an audio subsystem which is made as a separate SupremeFX II board:  ASUS Striker II NSE - Layout and FeaturesThe cooling system for ASUS Striker II NSE looks quite impressive, primarily due to the water block on the north bridge. This water block is aligned with a massive radiator, which allows overclocking the system without using a water-powered cooling system.  Also, rather large radiators are installed on the elements of the power converter on the south bridge as well, and they are all interlinked with heat pipes into a unified system. We should note that the massive system for cooling the motherboard does not create any issues for the assembly operator. In particular, the main 24-pin power connector is installed on the board's bottom edge, with the additional 8-pin connector (the backward compatibility to the PSU with a 4-pin cable has been preserved) - on the right-hand edge: 
In fact, there can be found something to find fault with the PCB design: after installation of a full-length PCI-Express video card into the first slot, DIMM slots are partly blocked. Near these slots there is a 4-pin CPU_FAN connector to plug in the processor cooler.  Besides it, there are seven (!) more 3-pin connectors:
Note that the Striker II NSE board not only determines the rotational speed of all the eight fans but also controls the speed of seven of them depending on the temperatures. Let's once again look at the water block of the north bridge, which is connected to the radiators of the south bridge and the power supply module with heat pipes.  All the heavy radiators are fixed on the board with reinforcement plates which also do the job of heat rejection:  Under the north bridge, there are four DIMM slots. The maximum memory capacity makes 8 GB.  To enable the dual-channel mode, the memory modules should be inserted into the slots of the same color. Once voltage is applied to the board, illumination of the Power and Reset buttons, as well as that of the decorative block lights up on the NB radiator. As regards the expansion options, the board uses three PCI Express x16 slots (all with holders) as well as two PCI Express x1, and two PCI slots.  It should be noted that to the blue PCI Express х16 slots there are 16 PCI-E version 2.0 bus lanes allocated, 16 - to the white PCI Express х16 slot, albeit of version 1.0 Expansion optionsASUS Striker II NSE supports 8 SerialATA-II links. Six of them are supported by the south bridge nForce 570i MCP, with two more - by the additional controller JMB363. The SATA connectors of the south bridge are painted blue and orientated in parallel to the board's plane.  As regards the SATA connectors of the additional controller, they are brought over to the board's rear panel. The controller itself is positioned near the panel:  In the end, as many as 10 hard disks can be plugged in to ASUS Striker II NSE: eight disks over the SerialATA II, with 2 more via the ParallelATA. Then, on the board there are two Gigabit LAN controllers 88E1116 made by Marvell:  The board supports ten USB 2.0 ports, six of which are positioned on the rear panel, with 4 more plugged in via plates (the board comes bundled with a bracket for two ports). Besides, the board offers support for the Firewire bus. For that, there is an additional VT6308P controller made by VIA. Therefore, the board offers support for two IEEE1394 ports: one on the rear panel, with the other one connected with a plate (available in the package bundle).  The last thing to dwell on is the integrated High Definition Audio. The ADI 1988B chip is used as the codec which supports output for 8 channels. 
Recall that the audio subsystem is on a separate board.
The board's rear panel looks like this:  You can notice see a complete lack of LPT and COM ports. We note a connector to plug in a LCD Poster, optical and coaxial SP-DIF outputs, a Firewire port, two SerialATA ports, as well as buttons to clear the CMOS settings. Traditionally, a jumpers layout diagram:  The diagnostic LCD Poster screen allows keeping track of all the stages of system start-up, which allows localizing a fault whenever a trouble comes up. Engineers at ASUS have implemented an additional feature that prevents the LCD screen from running idle upon successful start-up: the screen displays a custom line or the current time. Both can be selected from the BIOS:   Unfortunately, you can't enter a long line (although it can't be simpler to implement scrolling), and in the line itself you can't input many characters (e.g., "-" or a "space"). Now on to the BIOS settings. BIOSThe BIOS of ASUS Striker II NSE is based on the Award BIOS Phoenix version.  The extended pack of memory settings is in the "Extreme Tweaker/Memory Timing Settings" section:  The parameter in charge of selecting the memory operating frequency is in the section dealing with overclocking settings:  The frequency values are displayed in the quadruple form. By the way, the user does not have to rack brains but simply choose the required memory frequency multiplier (in the Linked mode):  Now move on to the section to do with the system monitoring.  This section is really powerful. First, the board is able monitoring the current temperature of the CPU and the system, the temperature of the chipset (both on the north and south bridges) as well as three temperatures from additional thermal sensors. The user gets the unique opportunity to keep track of the temperature of any system components within reach of these sensors (the sensors are available in the package bundle).  Secondly, the board monitors all whatever voltages of the system:  Thirdly, the board monitors the speed of all the eight(!) fans which can be plugged in,  and controls their speed (except the PWR_FAN) using the Q-Fan feature:  We also add that you can do the system monitoring from within Windows with the PC Probe2 utility.  It should be noted that the user gets access to all the technologies supported by modern processors,  as well as displays the BIOS settings in multiple languages:  Another point to note is the support for the MyLogo 3, a feature for changing the boot-up image (POST-screen), as well as the CrashFree BIOS 2, which allows restoring the damaged BIOS firmware using the image on a diskette, flash disk, or a CD (note that the first Striker supports the more advanced Crashfree BIOS 3 which allows restoring the firmware via a flash drive as well). The BIOS version can be updated in a number of ways. First, make use of the AWDFLASH (DOS) and ASUS Update (Windows) utilities, and in the latter case the POST image can be recorded into the BIOS with the ASUS MyLogo 3 feature. 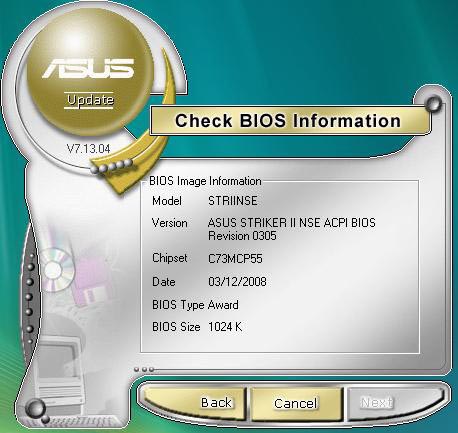 The user can resort to the EZ Flash 2 utility integrated into the BIOS. 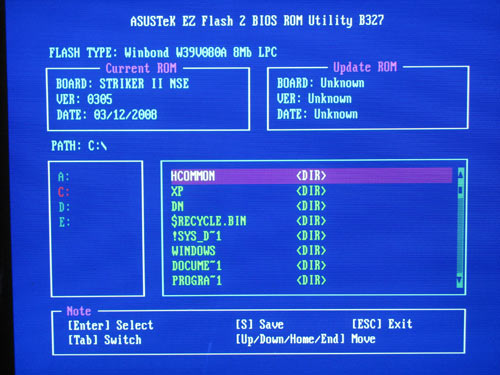 We note support for the power-saving technology EPU. The software part is represented by a pack of respective utilities, and the hardware part - with a chip near the CPU connector:  We'll be talking about the efficiency of technologies by various manufacturers later, once we get the hardware required for tests. In conclusion, we note the OC Profile technology which allows saving all the BIOS settings into memory and loading them on demand.  Overclocking and stabilityNow let's look at the power converter. It uses a 8-phase power scheme, in which there are two 270 mkF and eleven 560 mkF capacitors.  As we already stated, there are massive radiators on the power components. On installing a powerful CPU cooler, these radiators are cooled by the incident air flow. Otherwise (e.g., with a water-cooled system on), the user can install an additional fan (available in the package bundle). Now move on to examining the overclocking features which are gathered in the "Extreme Tweaker" section.  ASUS Striker II NSE allows adjusting the FSB speed within 100 MHz to 750 MHz.  The user can change the HyperTransport bus multiplier:  Besides, the PCI Express bus speed is adjustable within 100 MHz to 200 MHz (in 1 MHz increments). At the same time, the bus speed for the third (central) slot can be set independently.   If necessary, the user can change the processor's multiplier (which is locked towards the increase in all Intel processors):  The adjustment range is within 6 up to the maximum, in 0.5-1 increments. The next feature allows adjusting voltage on the CPU (Vcore) within 1.1V to 2.4V in 0.00625-0.025V increments.   The next feature raises voltage on the memory modules:   The adjustment range for Vmem is extremely wide (within 1.5V to 3.1V in 0.02V increments)! Moreover, there are a few more settings that allow adjusting voltage on the memory controller, which can be done independently for each link and each DIMM slot:  There is also a couple of useful features for adjusting voltage on the chipset. The voltage adjustment range is within 1.3V to 2.2V in 0.02V increments:   The voltage adjustment range on the south bridge is is within 1.5V to 1.875V in 0.05V increments:   Then, ASUS Striker II NSE allows adjusting the PLL voltage within 1.5V to 3.0V in 0.02V increments: 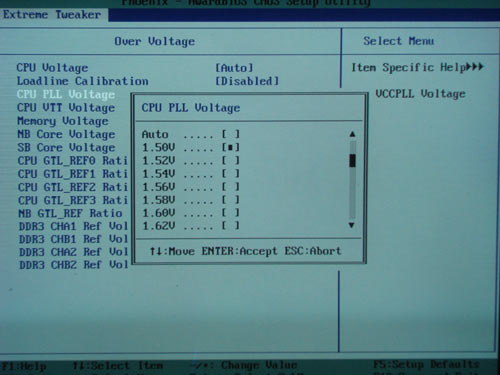  Besides, the overclocker can adjust voltage on the CPU VTT within 1.2V to 1.55V in 0.05V increments:   The board does not support the CPU dynamic overclocking feature ("NOS") which was implemented on the first version of the Striker model.  However, there is a feature for automatic setting of all the required parameters during overclocking to a fixed value (selection of overclocking rate is defined in percentage).  Besides, the beginner overclocker can make use of the "CPU Level UP" and "MEM Level UP" features:   Overclocking from within Windows is done with the Ai Suite utility.  Now on to the practical overclocking.  That is the highest FSB result for a motherboard based on the NVIDIA chipset that has been fixed at our test lab. During the overclocking experiments we came across no issues and found no signs of a strange behavior of the board (as it used to be with ASUS' previous motherboard based on NVIDIA chipsets). We also add that this result was achieved without using a water-powered cooling system, at the north bridge voltage = 1.48 V. Higher Vdd voltage resulted in the reduction of stability, which points to the need for using a water-powered cooling system during extreme overclocking (starting with FSB=550 MHz). During the performance tests, we compared ASUS Striker II NSE versus ASUS P5E3 Premium (Intel X48) and Gigabyte X48-DQ6 (Intel X48). In our test setup, we used the following hardware:
Let's first take a look at the results of synthetic benchmarks.  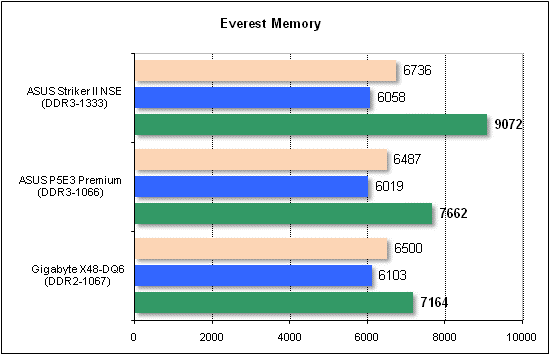   Now on to the gaming benchmarks.     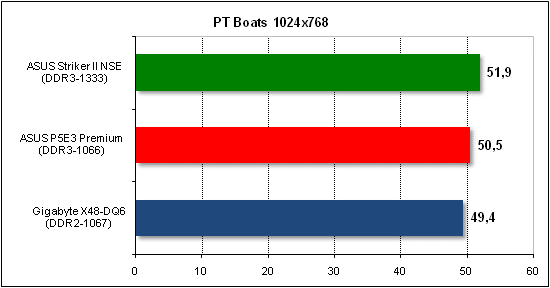    Tests of application software.    Video encoding (DivX, Xvid) was measured in seconds, i.e. the less the better.   Data compression (WinRAR) was measured in Kb/sec, i.e. the more, the better.  Final WordsLet's start with conclusions regarding the chipset NVIDIA nForce 790i (Ultra) SLI. Since DDR3 memory is already quite affordable, we can safely recommend motherboards based on nForce 790i SLI. The thing is, technologically and architecturally this chipset is superior to nForce 780i SLI. In the nearest future, its attraction will be going up at the pace the prices for DDR3 are going down. As regards the choice between the regular nForce 790i SLI version and the Ultra version, we should keep only one fact in mind: "Is the extended support for high-speed DDR3 modules with frequencies at least 2000 MHz really needed?". If not, the choice is straightforward: nForce 790i SLI. However, motherboard manufacturers will be producing more powerful models on the Ultra version, and the matter of choosing the chipset will grow up to be a matter of choosing a motherboard. Now, conclusions regarding the board ASUS Striker II NSE. To start with, it is the first and only ASUS motherboard based on NVIDIA's high-end chipset, and we found no issues in the technical side. However, the retail price is definitely far from making the buyer delighted, and the positive conclusion is possible only due to separate shortcomings of previous motherboards. It is also not clear where the serial number for 3Dmark 06 suite (a bundled item). We separately touch upon the topic of overclocking. At that, ASUS Striker II NSE has shown superb results and become on par with best overclocker-friendly motherboards based on Intel chipsets. In particular, we were able to overcome FSB=550 MHz without using fluid-powered cooling systems. We are sure that use of such a system and more optimized BIOS versions will make further overclocking quite feasible.
ConclusionPros:
Cons:
The board's specific features:
- Discuss the material in the conference
|
||||||||||||||||||||||||||||||||||||||||||||||||||||||||||
|
|||||